All posts by faceness

My experience with the Behringer XR18 Wireless Mixer.

XR18_P0BI8_Fisheye_XL

What is an XR18? Imagine, if you will, a Digital Mixer and squishing it into a 10 pound box capable of fitting into a rack space. With four effect sends (With tons of capable effects!), 16  Combo XLR / 1/4 inch inputs, two line ins, 6 aux sends and L/R Main out. It’s the most versatile compact mixer you will ever own. Each of the 16 channels has a complete channel strip including: Gate, Compression, EQ, phantom power. Not only that, but It is built with the award winning MIDAS Preamps.

The mixer is controlled wirelessly via its internal wifi router, or optionally, through a network adapter. It is compatible with IPAD or android tablets, and mac or windows computers, and Behringer is still developing for other systems as well so no OS is left in the dark.

But we still haven’t gotten to the best part yet, It is capable of full 18 channel multi-track recording. (yes, you can record your stereo line in as well). This might have already sold you on the mixer alone, so what’s the catch? Honestly, I haven’t found one yet. In order to purchase a digital board capable of what the XR18 is capable of, you would have to spend around $5000 minimum, assuming you’re going for all the outboard gear and effects racks as well. The XR18 is currently selling for $699 at Sweetwater.com.

I have currently recorded several shows that I am in the process of mixing down a few samples to which I will post and make available in the Future.

A roughly mixed sample of a show I used the XR 18 to record can be found here.

https://www.dropbox.com/s/kwghljk2v393jee/Omar%20and%20the%20howlers%20Rough%20mix.wav?dl=0

(Note: My interface wasn’t up to speed when I recorded it, so there are a few skips in the file, this is due to my interface, not the XR18. I switched to protools now and have had no further issues with skipping. I will upload a few better recordings in the future.)

3 Incredible pieces of recording gear for Studio, Live, or Home!

It’s incredibly difficult to know for sure what you’re getting into when you are looking for away to record a song. No matter if you’re recording In a Studio, at a live venue, or just jamming out in your bedroom when inspiration strikes. There is a piece of equipment that fits each need. This is a comprehensively short list of a few very highly recommended pieces of equipment that have held their own in a recording situation.

1. Roland Micro BR

microbr_lIt might be easy to see why this I’ve chosen the Micro BR to be a candidate for my list. It is tiny. No seriously, you could fit this in your pocket and record anywhere. Primarily, the Micro BR is targeted toward guitar players who just like to record a song but aren’t capable of pulling out the amps and mixing board and dozens of cables needed to set up a recording session. But it also works with any other instrument with a 1/4″ output. With the Micro BR, all you need is the output from your guitar or pedal board and you’re good to go. The device runs on battery life or AC voltage. It comes with preloaded drum tracks to get you started with your jams, or you could make your own with it’s user friendly track creation tools. It also allows you to import a track from an SD card so you can play along with it. Pretty cool stuff. The Micro BR lets you record 4 separate tracks along with your drum track. Don’t worry about track space, once you nail one track, you can merge it with another track to create another space to record. There’s always a way, and it’s always easy to do.

2. Tascam DP 24

dp-24_p_ov30_right30

If you’re an up and coming band that is looking to engineer your own recording session, what more could you ask for? The Tascam DP 24 offers 8 XLR/TRS inputs to record up to 8 channels at the same time. With 24 available channels for playback, that’s enough channels for the entire band and a few extra for whatever industrial samples you want to throw in there as well. The Tascam has a very easy to read interface with a bright color display show you what parameters you’re tweaking. It also comes with a CD writer built in, so you can export a quick mix to a writable disk to test on another system. The Tascam DP also come in 16 / 32 Channel alternatives in case 24 channels is either too much or too little for you. But the 24 is at a nice medium price range with enough channels for a decent recording. The Tascam works with the user no matter what their technical level may be. It’s a great addition to any recording artist’s arsenal of equipment.

3. Presonus StudioLive

mediabar88

The Presonus Studio Live is a mixture of both live sound and Studio engineering. In that regard, it’s perfect for almost every recording situation. Why is that? Because the Presonus features multichannel recording straight into a DAW. Not just two channels from the main sub. The Studio Live records all 16 separate tracks into a DAW via Firewire connection. There’s no other board in this price Range that can do that. Most sound boards only record from the L/R Mains, which is nice, but not for a studio or live engineer who gets paid for his/her work. With it’s compact design, it can be taken anywhere with no struggle and set up in no time. you can engineer a live performance at the same time as you’re recording it and have it on your computer to either export or take it home for mixing/mastering. It’s a great way to have a home studio setup, and a board for live shows for the engineer who lives both of those lives. Well worth the price and will end up paying for itself in the ling run if you use it right.

Well, I hope you found my recommendations helpful for whatever need you were looking to fulfill recording-wise. What pieces of recording equipment have you had great success with in the past? Please share your experiences and I’ll make sure to engage the comment section. Have a good one!

Amazing musicians who have performed at the Roost

During the months I have been at the Roost, there have been some absolutely phenomenal performances that have made Roost history. The shows that have resonated with me the most are the ones I’ve chosen to write about in this feature; Here are some amazing Musicians that have Rocked the Roost.

Lance Lopez

10993441_10206052031008752_1260317383156231389_n
Lance Lopez (Left) Pictured with Malford Milligan (Right)

Lance Lopez is a blues phenomenon. Take Stevie Ray Vaughan and Led Zepplin, then smash them together. One of a kind guitar tone, driving bass lines and powerful drums make for a most desirable three piece that most Quartets wish they could sound like. Lance tirelessly performs flawless solos that cut through the air like butter. With a voice that just screams gritty blues, there’s no substitute for Mr. Lopez. Lance plays at the Roost often, so you have plenty opportunities to catch this amazing act.

Carolyn Wonderland

1622044_619730278171240_3131469161211688207_n

Carolyn Wonderland is a home-grown hero to the Austin scene. She’s been around for a while, so it’s without question that she knows how to put on a show. She’s got a masterful grasp of the guitar. I can’t say I’ve heard anyone that sounds much like she does. There’s so much to be said about a musician of this caliber, I don’t know where to begin. What I’ll say is this, Carolyn is one of the most ‘Austin’ Musicians I’ve seen in a long time. You’re doing yourself a great disservice if you don’t see her live at least once.

The Wyldz

10915295_600021800130276_7321637364672311016_n

What can I say about the Wyldz? They Rock. Seems to me a few members of the band got together and said something along the lines of: “Wow, hold on there, this is Rock ‘n Roll. We need to sound like we just crash landed on mars and have to rock our way out of an alien space battle.” Which is exactly what comes to mind when you hear them live. The Wyldz are a legendary force in the making, straight from overseas, ready to rock our nation into space. It doesn’t really have to make sense, it’s just Rock ‘n Roll!

Ruthie Foster

Ruthie-Foster-Photo-by-Riccardo-Piccirillo-

Ruthie Foster is one of the classiest performances I’ve seen at the Roost, by far. All it takes is a guitar, a little bit of percussion, and a soulful voice. I don’t think I’ve felt as much atmosphere in the room as the night she performed at our venue. I was excited to finally see what all the hype was about Ruthie, and was not disappointed at all. There is a depth of understanding that she has with music that most people in the world will never even know exists. The best thing you can do to understand what I’m talking about is to hear her performing live.

Chris Duarte

1275281662_chris-duarte-group

Chris Duarte brings a whole new meaning to “playing ’till your fingers bleed”. I don’t think I’ve witnessed another act working so hard on stage to make the sounds he does. You can see him playing commanding his guitar to the point of downright insanity. Everyone breaks a string now and then, that’s why some guitarists have a backup guitar to switch out with. But when you go through every single backup guitar and end up at the point where you are changing strings in the middle of a song while a few natural bars of bass and drums taking the front stage, then that’s when you know that you are Chris Duarte. I had honestly not even noticed that he had switched out strings until later on that evening. It was just that natural on stage. If you’re a guitarist, make sure to keep an eye out for the next time Chris Duarte comes back to Austin. He’ll be at the Roost again on April 12th, 2015. If you’re in the area, I highly recommend catching this show!

chris duarte bloody pickguard
Chris Duarte’s Guitar Massacre

What is the best live performance you’ve ever seen that you hadn’t already known about before the show?

5 Microphone tips that will improve your recording sound quality.

SM58

Many new engineers struggle with getting a recording to sound just the way they’re looking for. Without realizing it, many things you do can (and will) influence the way your recordings sound. Here are a few tips to think about while your setting up a microphone that can help you improve the quality of your microphone signal.

1. Know what mic you should use

PIC_product_TG-Gruppe_3c_05

Many situations can call for more than just your goto SM57 for the snare head. But as far as getting what you want out of a sound source, start with the industry standard and go from there. If you know what everyone else uses and know how that will pick up your sound, then you will better hear the difference when you switch mics. Then, you can make proper adjustments in the future if you remember how one mic sounds in comparison to another.

2. Use Stereo micing techniques for large sound sources

imagesP89LI18V

What’s the best way to record a full drum kit? What about a Choir or orchestra? Individually micing each drum head and cymbal will sound great, but don’t forget that when you are listening to a drum set being played, you’re listening to the “Room” as well. Without it, you can make a recording sound small and intimate, but with the room sound, you will hear a broader dynamic and a sense of “Presence”. Same goes with a choir. Why do you record a choir inside a chapel? In order to record the room! The acoustics is the most notorious reasons to record in a huge room of a chapel.

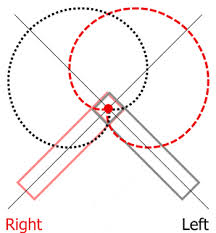
The recording might sound good, but recording in stereo may make it sound GREAT! Experiment with stereo micing techniques. X/Y is very common, especially in handheld recorders, (Pictured above) So this is a great stereo setting to start out with.  If you record a show room in stereo, it will be a natural sounding recording as if you had stepped into the room yourself.

But you can’t just place a mic wherever you want, which leads us to point 3.

3. Know the Polarity specs of your microphone.

polarity%20chart

What is Polarity? Polarity affects where the sounds best when it hits the microphone. In other words, Know what direction your mic needs to be facing, and how close it needs to be to youe sound source. Microphones have a sonic “Bubble” Where a sound source will be picked up most efficiently. When you buy a microphone, it should come with information about it’s polarity, so make sure to check those schematics before you start placing your mic.

4. Know your sound source

images0388916Z           imagesXK8K4143

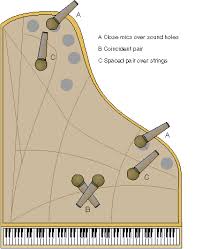
Knowing the polarity Pattern of your microphone is important, but it’s just as important to know where your sound is coming from. An incorrectly placed mic can make all the difference in a stereo recording or when recording an amplifier. If you are Recording a piano, one mic alone wont normally capture the complete sound of the instrument. Use two or more mics in a few areas where the key features of a piano can be found.

If you don’t know where the key areas of an instrument lie, ask yourself a few questions: What do you normally hear when listening to the instrument? What do you want to hear the most when recording? Make sure you’re capturing the most significant or iconic details of the instruments sounds. Acoustic Guitar plucking, the beater of a kick drum, the sizzle of a hi hat. Know what you want to hear of an instrument, and make sure that get’s a properly placed microphone.

5. Experiment with your microphones

photoStep away from the EQ. That sound you’re looking for is probably just a few inches away from your sound source or may be hidden within the complex signal flow of another microphone you’ve got tucked away in your closet. Even if you don’t like the way something sounds, you can always change the way an instrument sounds. By changing the direction a mic is facing, you can come across something that sounds better than what you would have EQ’d it to be in the first place. Experiment with your techniques and you may find a new sound that you never knew that you wanted!

Those are just a few basic tips to think about that may improve the sound quality of your recordings. Did you learn anything new? What techniques do you have that you’ve found through experimentation? I’d love to hear some thoughts. Let me know and maybe we could share some ideas!


Engineering a live recording Pt.2

This post is a continuation of a previous post.

What is a good way to utilize a digitally split Multi-channel Audio signal?

recordingaliveshow_02_zoomH4N
http://www.soundonsound.com/sos/nov11/articles/recording-live-show.htm What’s wrong with two track recording for a live show?

Before getting started, what is the difference between recording MADI Signal and taking a direct L/R signal straight from the sound board?

For one, if you intend to sell a digital recording of a performance, two track recording isn’t the best way to control what you are going to be giving to people. Using MADI allows you to have complete control over the sound of every signal being sent into the recording. There’s no better way to create a live recording that will stand the test of time as far as audio quality and capturing the complete performance.

One way is to use it to save a recording of each channel being sent to the FOH. The best way to do this is to send it to a DAW (Digital Audio Workstation) Such as Protools. But there is no way to send input form an XLR Cable to a computer without the use of a analogue to digital audio converter. There are several ways to do this.

1. One way is to purchase a MADI Converter. This will take the MADI Signal from the CAT5 or Coaxle Cable and convert it into a digital signal that you could plug a USB 2.0 cable into the laptop with.

2. If you don’t have MADI capabilities. Another way is to dedicate an XLR to digital audio converter that will be used to plug straight into a laptop, sort of like a digital preamp used for recording a single instrument at a time. But one XLR Converter that can process about 32 channels at one time is a little expensive, but it is a good alternative to MADI if you are not capable of using MADI cable.


Engineering a live recording session Pt. 1

10552592_495422900601979_1793361549213439390_n
KISS Army performing a live show, to be recorded live and sold after the show.

This post is a response to a similar post about live recording.

http://www.soundonsound.com/sos/nov11/articles/recording-live-show.htm

There are several techniques for live recording that you could utilize. I’m going to go over what The Roost uses to record live shows and create a mix for people to purchase before they walk out of the building.

Some technical specs before I begin the process; It’s important to understand the difference between digital and analogue signal.  When using an analogue sound board, the signal is processed by dedicated circuitry that is designed for one use only. It is both reliable and easy to fix if it is ever nonfunctional. Digital sound boards work from process intensive computing in order to manipulate the sound in several unique ways. With an analogue board, the use of outboard equipment (Equipment that is recommended, if not necessary to use alongside an analogue sound board), whereas a digital board has it all built inside of it in one neat package. The limited output and input structure of a digital board far surpasses what an analogue board can handle. Most digital boards can assign 32 inputs and 64 outputs. Most Analogue boards are limited to 1;1 output channel strips with no splitting capabilities.

The Roost uses a Soundcraft Si Performer digital sound board with 32 XLR inputs and 64 outputs via MADI cable. (Multi-channel Audio Digital Interface) The MADI signal is then ran down to the FOH (Front of House speakers) and run into a compact digital splitter. The splitter takes the signal and processes it in two different ways.

recordingaliveshow_01
Photo Credit: http://www.soundonsound.com/sos/nov11/articles/recording-live-show.htm

1. It takes the signal and sends it into the amps pushing the FOH.

2. It assigns 1:1 I/O (Input / Output) from all 32-64 outputs  for taking and utilizing that digital signal in any other ways necessary.

Now in what ways can we utilize this signal?

The Roost, live music venue in North Austin.

The Roost's front doors
Photo Credit: http://www.austinpixels.com/

Mother Falcon Photo Credit to Steven Mackie Photography: https://www.facebook.com/SMLivePhoto
Mother Falcon
Photo Credit to Steven Mackie Photography: https://www.facebook.com/SMLivePhoto

Hello there, my name is Crimson, and welcome to my blog. I’ll be posting all about things pertaining to my experience in the field of Audio. This includes venues I’ve worked at, projects I’m working on, places I’ve been, people I’ve met, and just about anything that I think will make an interesting read.

As this is the first post of the blog, I’ll be talking about the place where most of my musical and audio experience has come from. The Roost is a relatively small north Austin Venue that has caught a lot of attention from music lovers around the area due to it’s $450,000 Bose PA System. $35,000 worth of lighting equipment washes the stage full of colors for performers to look their best.

The venue has been built around the stage. By that, I mean that the entire room was torn apart and modeled specifically for the purpose of better sound. Every wall in the building is angles slightly toward or away from the ground in a way to dilute the sound. You’ll never hear a better sounding room of this size anywhere in Austin.

This room has housed some absolutely legendary performances by sensational local and national artists including, Mother Falcon, Shinyribs, Los Lonely Boys, Chris Duarte, Del Castillo, John Fullbright, Glenn Tillbrook of ‘Squeeze’, Bob Schneider and many countless others.

Mother Falcon Photo Credit to Steven Mackie Photography: https://www.facebook.com/SMLivePhoto
Mother Falcon
Photo Credit to Steven Mackie Photography: https://www.facebook.com/SMLivePhoto

What is the best sounding venue you’ve ever been to? Let me know and I’ll invite you to the Roost to see a show so you can make a comparison.